After kicking it around I'm renaming the new layout to the Savannah Central. Trying to keep all my files straight and make it searchable on the internet became too problematic with the "II" version. Tonight I'm moving the finished computer into its new home now that everything is backed up. Marie is loading the anti-virus software.
Friday I visited my friend Long Lens Mark and got a look at his layout under construction. Wow, this is going to be a fun layout! It is an industrial/port railroad designed by Byron Henderson and it has incredible operating potential. Mark is an expert photographer (saw his new book!) and I plan to learn a lot about photography from him. We got started by talking photos while we visited Ogden's station and the hobby shop. Got in late so I missed going to Thayne's.
I probably should clean up the shop again.
2012's Goal - Finish AP Civil and Structures on the Savannah Central

Saturday, December 31, 2011
Willamette River Railway - Layout Complete
This is the final drawing of the layout to be submitted to Thayne which includes everything but the turnouts layer. This has been a fun project and knowing Thayne, will be completed in a few years. I look forward to working with him on construction and we may tweak the drawing as we go along. Thanks for coming along on this adventure!


Full Drawing - Click to Enlarge

Close Up Drawing for Construction
Willamette River Railway
Layout Statistics and Information
Updated 12-29-11
Owner: Thayne Tenney, Sandy, Utah
Designer: Scott Perry, Sandy, Utah
Scale: HO
Gauge: Standard
Standards: NMRA
Track Centers: 2 2/3” mainline, 2” yard and other
Size: 8 x 20 feet
Railroad: Union Pacific, Portland Terminal Railroad Co.
Height: 49 1/2”
Track: Atlas Code 83
Turnouts: Walthers’s Code 83 Turnouts
Turnouts: Mainline #8, Sidings #6, Switching District #5
Radius: Mainline minimum 32”, Switching district 18”
Grade Maximum: 2%
Sub-Roadbed: spline or cookie cutter plywood
Roadbed : Homabed or homasote
Layout Style: twice around, over under with lift outs, hidden staging.
Track Clearance: 4.5”
Train Length: 8 cars, 50 foot length + loco is average
Control System: MRC Prodigy Advance 2 DCC
Purpose: Hauling freight through Portland on UP’s Brooklyn Subdivision, moving freight to the Portland Terminal customers, and supporting customers on the mainline including a large power station.
Traffic: grain; IBC’s, coal, mixed freight, etc.
Key Industries:
1. Greenbrier Rail Services (repairs rail cars) – steel & parts in, railcars out.
2. Ashland Hercules (chemicals) – chemicals in and out
3. Boydstun Metal Works – scrap metal in and out
4. Port of Portland Dock 2 – any dry commodity
5. Portland Grain Terminal – grain in and out
6. Eugene Grain and Feed – grain in and out
7. Boardman Plant – coal in
8. Portland Chemical – chemical hoppers out
Willamette River Railway - Any Port in a Storm
Let's finish up the port now that we have some ideas.
 First I trimmed out a lot of the track to open it up for more scenery options and less switching headaches. We'll still with just three or four industries. I put out the names of the industries and will start plugging them in.
 Ashland Chemical will be the fun one. It can take a lot of varied traffic. A much later addition of a spur requires some unusual trackwork (from a real Portland prototype) and the tanks and piping will add interest.
Greenbrier Rail Services will be isnide a building where they will repair and rebuild rolling stock. This industry can take any type of car. Gunderson LLC was there, but has been yanked.
 Boydsun Metal Works will get the prominent spot and a small dock along the river for chopping up metal. It will move a lot of gondolas. On the left I've put in a general port dock for loading and unloading that will reach out to the river. Flats, gondolas, and intermodals along with flat steel can be loaded/unloaded here. So far we have simplified the track and made industries from real businesses.
 There are several elevators in the area. This is one close to the yard.
 Here is another very large one. They never put the name on the mills in this area.
 Even the view from the bridge didn't show a name. We'll just name it for Portland.
 Portland Grain is a large consumer of grain, so we'll need a large producer. We'll also add Portland Chemical which could be both import and export. This industry is in front of the yard and actually exists, though I don't know its name.
 To make the industry seem like it is much further away we'll call it Eugene Grain & Feed. They will receive (to make feed) and ship (corn) off line and to the Portland Grain Terminal.
 Thayne has almost completed the assembly of a coal fired power plant, and we want to incorporate it on the layout. Oregon has one coal plant and that is the Boardman Plant for Portland General Electric. It will get its coal from Wyoming and will come from the staging tracks. Getting track to the plant has been a problem, but I think I've got it fixed.
 The only real way to access the back corner is from the Eugene yard. Guess I need to name it, so I'll do that first. It's Albina Yard, btw. So we'll need to put in a turnout at Eugene to feed cars to the plant. The plant is large and I don't have exact measurements, so we'll have to work this one out.
 The siding is longer than I thought, but unloading the coal train will take two shifts, which will be fun. There is plenty of siding and the whole grain train can fit in its siding.

There! I look some time and went over the layout and added some things, move some things, and put in some bridges. I think we have a layout.
Thayne...ball is in your court. Does this work? Any changes you want to make?


Greenbrier Rail Services will be isnide a building where they will repair and rebuild rolling stock. This industry can take any type of car. Gunderson LLC was there, but has been yanked.


Final Plan for Review - Click to Enlarge
There! I look some time and went over the layout and added some things, move some things, and put in some bridges. I think we have a layout.
Thayne...ball is in your court. Does this work? Any changes you want to make?
Willamette River Railway - Portland Terminal Trackage
Hi all! I'm working on wrapping up the design for the Willamette River Railway. There are a few things I need to do:
1. Finish the port trackage
2. Install the siding for the Power Company
3. Wrap up the drawings and make a final post
Let's start with the port traffic. Normally the LDSIG group is a bit more helpful. I only got a couple of post. Mainly they are big layout snobs, so if you post something small they ignore it. I'll challenge any of them to a small layout design contest any day as I believe the smaller the layout, the harder it is to design. Click on the pictures below to enlarge.
 First, let's head to the HQ of the Portland Terminal Railroad Company in Portland. With the magic of Google Maps we can be there in a second. The area covered by this railroad which is 60% owned by the UP is quite vast. It could be a house sized layout all by itself and never capture all of it. How about that turning loop in the yard? That is what I want to do. Just grab certain key affects from the area to give the layout the flavor of the railroad. As you can see here this is Guild's Lake Yard. I have a separate map of it. One interesting note about the loop track is "you can only go one direction on the loop or the loco will derail" and the speed limit is 5 mph. Stable track!
I know that steel comes in and out of this port, and some comes from Japan. Kyle Weismann-Yee of the Brooklyn Sub Yahoo Egroup was kind enough to inform me that Gunderson is a rebuilder of railcars and is a big employer in the area. Let's check them out.

Here is an excellent loading dock! Steel is offloaded from ships and put on special flat cars for use in building ships I believe. Note the great curve, the crane, how the lines are painted and the lights. Simple, but very interesting. It would be easy to model.

A bit blurry, but Google does have some great angles. Note the crane. This is right across the river from the Brooklyn(?) yard. Guard shack, water tower, fence. Great but simple detail.
 Here are some of the special steel plate cars. This adds a lot of interest and they would be easy to build. They could shuttle back and forth to another facility, or ship as outbound freight.
 Google can give you a nice shot of the front of Gunderson's building, too! Here it is on Front Street, so we probably need to add Front Street to the layout.
 Look at the great scenery across the street! Thayne, here is your prototype scenery shot for the front area.
 Here is Gunderson Marine. The rail car service company is called Greenbrier Rail Services. Apparently they build most anything in steel. The pier is excellent and shows some fun modeling opportunities, especially the small trestles going to the pier.
 In the port area you can see some interesting solutions to how building are built around the right of way. One solution is to square off the building in sections, or just cut an angle off.
 These buildings are curved to fit the right of way. Oh! And a ton of fancy trackwork!

Ashland Hercules has a plant next to the yard. I love chemical plants! They are interesting to look at and take a ton of different cars including tankers, flats, box and covered hoppers. We'll add them to the list.
 Here is an industry with a name and an open bay door for railcar service. Maybe this would be a good industry. We'll zoom in to street level.
 Well, looks like Pacific Tool isn't using this for rail cars...so we'll keep looking.
 Specialty Steel Services is another good railroad customer as they move steel in and out.
 Wow! This is perfect! The Boyston Metal Works. They scrap almost anything. Its dirty and just perfect for a port.
 Here they are loading gondolas with scrap. Lots of fun, beat up car work here.
 They have their own switcher and cars.
 Oops! Looks like some train cars, wheels and other railroad items made it to the scrap heap as well.
Let's take these industries and put them into the port: Gunderson/Greenbrier, Ashland/Hercules and Boyston.
1. Finish the port trackage
2. Install the siding for the Power Company
3. Wrap up the drawings and make a final post
Let's start with the port traffic. Normally the LDSIG group is a bit more helpful. I only got a couple of post. Mainly they are big layout snobs, so if you post something small they ignore it. I'll challenge any of them to a small layout design contest any day as I believe the smaller the layout, the harder it is to design. Click on the pictures below to enlarge.

I know that steel comes in and out of this port, and some comes from Japan. Kyle Weismann-Yee of the Brooklyn Sub Yahoo Egroup was kind enough to inform me that Gunderson is a rebuilder of railcars and is a big employer in the area. Let's check them out.

Here is an excellent loading dock! Steel is offloaded from ships and put on special flat cars for use in building ships I believe. Note the great curve, the crane, how the lines are painted and the lights. Simple, but very interesting. It would be easy to model.

A bit blurry, but Google does have some great angles. Note the crane. This is right across the river from the Brooklyn(?) yard. Guard shack, water tower, fence. Great but simple detail.


Ashland Hercules has a plant next to the yard. I love chemical plants! They are interesting to look at and take a ton of different cars including tankers, flats, box and covered hoppers. We'll add them to the list.


Let's take these industries and put them into the port: Gunderson/Greenbrier, Ashland/Hercules and Boyston.
Thursday, December 29, 2011
000 Dixie Central II - Getting Ready
We start designing the Dixie Central II on Jan 1, 2011. The three zero's up in the title will be used to count the days. I've GOT to finish my remaining NMRA Achievement Program certificates before the National Convention in 2013 so that I can get my MMR at the convention with my friends there to throw things at me.
 Hey! Who took over my basement! Well, the first thing we have to do is throw out the riff raff and take it back over again. Actually my wife Marie is cleaning out her stuff now. I put up a table for her to work on and she is about half done tonight. Taylor is playing with this enormous Barbie Pleasure Palace for the time being until we find a place for it. Santa must bring smaller toys next year.
 My books are still a mess from when the movers destroyed them, so I've spend a large part of the day moving them and sorting. I've got layout design books mixed all through them, so all of those had to be located and placed on a special shelf. Wow! I can't get over how many track plan books I have and still I don't have them all.
 I still keep the old books as well as the new ones. The business books are being moved over to the other shelves. I'm throwing out all the Model Railroader Magazines from 2009 and back since I got the nifty DVD set that Kalmbach is offering. This is a MUST HAVE tool in your arsenal!!!
Right now the room is in reasonable order except for the old layout stacked in a corner. Hopefully I'll get a bite on it soon.
I'm already going through plans and ideas for the small basement area which is just slightly bigger than a bedroom. While cleaning it up I ran across Model Railroader April 2001 which has one of my all time favorite layouts in it...The Georgia Southern by Steve Flanigan. On page 48 (see, if you had the DVD set you could go look it up right now!) he demonstrates what I think is one of the finest small layouts ever built. It has a great blend of scenery, realism and operations that just can't be beat. I'll read the article again tonight.
So Jan 1 we get started! Maybe we'll finish this one!
Willamette River Railway - More Info
Ran over to Thayne's to drop off a book and he sent me some info...measured it on the odometer and he is exactly 1/2 mile from my door. Had I not been in a rush, I'd have walked it. I'll take his info and update the
Hey Scott, I did not have have time to look at your emails and blog much this morning. I am just catching up now. I was going to answer a few of your questions,
1. The lay out is 49 1/4" high the bench work is 48" add the 3/4" plywood and 1/2" homosote gives a total 49 1/4"
2. The DCC system that I have is the MRC PRODIGY ADVANCE 2 DCC
3. The 3/4" plywood and the Homosote are held in place with a few screws the Homasote is pretty much just tacked in place. The reason I did that is so I could use my router and a flush trim bit to give me the nice clean smooth even edge. My thinking is I can draw out the main line and pull a few screws and make any cuts with a jig saw or router, (just my weird way)
4. Randy was not at the train shoppe today or tomorrow so I am hoping he is working on Saturday so I can order the track and turn outs I only like to deal with Randy. Just a personal thing I guess?? (Scott - I agree and like to deal only with Randy)
5. My electrician Jimmy is ready any time to help me with the lighting. The delay is me... I cant decide what I want to use. I started a post on the MRR forum last night. I am hoping to get some good ideas.
6. As for making any changes on the track in the yard or port area I am fine with any good ideas. You guys know much more than I do.
Thank you for your help and your friendship.
Thayne.
I'm not familiar with the MRC system, but it should more than suffice and the hobby shop recommended it. Here's a link if you want to check it out. I love that it has a fast clock! What a great idea!
PRODIGY ADVANCE 2 "SQUARED"
Brand: MRC
Item # 0001414
Price: $429.98


Brand: MRC
Item # 0001414
Price: $429.98
Latest addition to the Prodigy line:
The ultimate DCC experience
If you're a multi-user, multi-cab club with a complex layout and you're ready to take advantage of everything the ultimate DCC experience can offer, Prodigy Advance Squared is the system for you. It is also the first DCC system so brilliantly designed that it eliminates the complexities of operation without sacrificing sophisticated technology and comprehensive features.
Prodigy Advance Squared features...
- Two or four digit addressing (0-9999 addresses available)
- Advanced and Universal consisting
- 14-28/128 speed steps for precise speed control
- Only Prodigy Advance can simultaneusly run up to 99 throttles using plug 'n play technology
- 28 accessory functions to handle multi- function sound systems like MRC Sound Decoders
- Fast clock with adjustable ratios for running your railroad on an accurate timetable
- Program all CVs with ease
- Program on the main or on the program track without affecting active locos
- Recall and stack features
- Program and set routes for multi-output N.M.R.A. compatible Accessory Decoders
- Comes complete with all the present N.M.R.A. upgrades and is easily upgradeable to any future NRMA protocols
- Wireless ready…just “Plug and Play”
- Comes complete with power supply, base unit and one handheld, [nothing else to buy to get started]
- No complex, hard to understand instruction manual. You’ll be running trains like a “pro” in minutes
- Extra ports on the console for additional handhelds and/or extensions plates
- When you're ready, you can upgrade to Prodigy Advance 2 wireless DCC... all you need is MRC's Wireless Conversion Set (0001412)
- Also available are power district boosters, ideal for larger layouts
Resources to Download:
1.) Prodigy Advance/Express info - CV29 table
2.) Prodigy Advance/Express info - glossary
3.) Prodigy Advance/Express info - running locos
4.) Prodigy Advance/Express info - troublehooting
5.) Prodigy Advance/Express info - turnout
6.) Prodigy Advance/Express info - voltage drop
7.) 0001414 Manual
8.) Prodigy Advance Tips and Tricks
 |
Willamette River Railway
Layout Statistics and Information
Updated 12-29-11
Owner: Thayne Tenney, Sandy, Utah
Designer: Scott Perry, Sandy, Utah
Scale: HO
Gauge: Standard
Standards: NMRA
Track Centers: 2 2/3” mainline, 2” yard and other
Size: 8 x 20 feet
Railroad: Union Pacific, Portland Terminal Railroad Co.
Height: 49 1/2”
Track: Atlas Code 83
Turnouts: Walthers’s Code 83 Turnouts
Turnouts: Mainline #8, Sidings #6, Switching District #5
Radius: Mainline minimum 32”, Switching district 18”
Grade Maximum: 2%
Sub-Roadbed: spline or cookie cutter plywood
Roadbed : Homabed
Layout Style: twice around, over under with lift outs, hidden staging.
Track Clearance: 4.5”
Train Length: 8 cars, 50 foot length + loco is average
Control System: MRC Prodigy Advance 2 DCC
Purpose: Hauling freight through Portland on UP’s Brooklyn Subdivision, moving freight to the Portland Terminal customers, and supporting customers on the mainline including a large power station.
Traffic: grain; IBC’s, coal, mixed freight, etc.
Willamette River Railway - LDSIG Design Feedback
The Layout Design Special Interest Group or LDSIG is a group of modelers that love to design or discuss designs for layouts. They are probably the most helpful group in the whole of modelrailroadom. Now that the layout has taken shape, I've posted a request for critique. Here is the first one that came through and it has some good ideas. I'll post others as I get them.
From: Mike Davison
To: ldsig@yahoogroups.com
Sent: Thursday, December 29, 2011 11:09:03 AM
Subject: Re: [ldsig] Willamette River Railway - New Track Plan
Hi Scott,
From: Mike Davison
To: ldsig@yahoogroups.com
Sent: Thursday, December 29, 2011 11:09:03 AM
Subject: Re: [ldsig] Willamette River Railway - New Track Plan
Hi Scott,
Looks like the plan is coming along nicely. Random observations:
-- The yard is a big portion of the layout. Might make sense to consider replacing the yard with 2 or 3 tracks on which the through trains can drop/pick up work for the local switch job instead. This would allow more space for a second industrial area, which packs lots of operation into a small space.
-- The industry area is a bit of a 'puzzle.' Sometimes people tire of switching puzzles after working them a few times. Problem? Does it make sense to simplify this a little?
-- The elevation markings near the right side have to be wrong. Elevation changes 4" in a very short distance. Not sure what the grade is there, but it's roller coaster range.
-- Great to see staging. I assume it's to be accessible from above. Might be small considering the capacity of the visible layout.
Regards,
Mike
Thanks for the great reply Mike...
I like the idea of reducing the yard and will give that a look.
I'm still not happy with the industrial trackage and agree with your idea to simplify and increase the number of structures instead. Switching it is time consuming. As with the prototype I thought of "mothballing" some of the tracks and letting them grow over.
All the grades have been checked and double checked...all grades at 2% or less. I've run trains in it several times without stalls or derailments.
The staging is accessible from below as there is a ceiling above. The elevated track next to it is open and you can reach in. Staging works by staging two trains per track for a total of four, two north and two south. It is a bit small but we have the potential to add staging to a nearby closet which may happen later and with a turning loop. That is the problem with smaller layouts as you need a certain amount of trackage for operations, but you don't want a spaghetti bowl. I've always said that small layouts are way harder than large ones to design.
Keep those cards and letters coming in! Thanks for the LDSIG help!
Scott G. Perry, CPM
Wednesday, December 28, 2011
Willamette River Railway - Latest Complete Drawing
Here is the latest complete drawing in large format with all of today's modifications...


Click to Enlarge
Willamette River Railway - Round the River
When I got there Thayne had been working on the benchwork again, rounding off some of the sharp corners. I love rounded benchwork and his modifications look spectacular. So I took another few minutes tonight and drew them in.
 Click to Enlarge Photo
The two sides of the entrance he rounded off, and he added a small rounded protrusion at the entrance. This is a great feature area, especially for something like a tug boat in the river or an elongated spur. I love it and it adds character to the layout. The other ripples along the water's edge I had already drawn, but still don't have measurements for.
Nice!
Willamette River Railway - Meeting of the Minds
I finally got time to go visit my buddy Thayne and see the work he's done on the layout. Naturally I forgot my !@#$!#$ camera again. Next time I'll run home and get it. We had a great time.
We went over the main line and traced it around the room. He likes it and doesn't want to make any changes. That is odd in that I've NEVER designed a perfect layout. Even after doing tons of them, there are always changes. No matter, we are good to go on the mainline.
We started talking construction and agreed that track laying needs to start with the hidden trackage along the back wall. While there we checked the measurement for the lower level fouling point. It was 4", which is what I had put into the drawing so we were lucky.
 I drew in the dimensions on the ROOM MEASUREMENTS layer and the back track falls right into place. I told Thayne that I would start with laying the two rows of hidden track first. He's got some reasonably new track that he took from his old layout that is in gauge and looks brand new. I recommended that he work with his track weathering and ballasting techniques on this section since it will be hidden and he can work the bugs out.
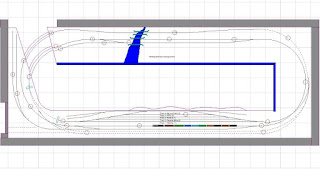
 This graphic is large, but is needed. This drawing has 1" squares for the graph so that you can locate turnouts and trackage. Remember when we used to get radius centers on our track plans? I think those days are gone. The big magazines want pretty layouts, not ones you can actually build. I'll do the radius prints later.
 3rd Plan It (from now on 3PI) has a handy tool that allows you to calculate the length of the mainline. What I did was turn off all of the layers except the mainline and the hidden siding. We have 1,337 inches of track, or 112 feet of track. Thayne needed this information so that he could go purchase the track for the mainline. This includes the lengths of the turnouts, but that won't matter since he'll need almost this much again just for the Brooklyn yard. Actually, I think I just found out that it is NOT the Brooklyn yard. More later.
Thayne will also need to buy the turnouts, so let's help him out here...
 I turned on the TURNOUTS layer and turned off all the track but the main and hidden staging. I get a nice print out and location of all the turnouts. I increased the font size of the description so that Thayne can read it easier. Here's what he'll need for the main...
Walther's Code 83, DCC Friendly - all of them
These little buggers aren't cheap, so THAYNE -please use the drawing to double check the list before you send it to Randy at The Train Shoppe here in Salt Lake City.
Randy and I talked about using Peco turnouts, but I have used both and dollar for dollar, I'd recommend the Walther's turnouts. Especially when using curved turnouts. Big trip to the bank for this, but the rest of the track is easy.
Thayne has already put down a layer of 1/2 inch plywood and a layer of Homasote over the entire layout. I probably wouldn't recommend doing that as it will create the need to saw some of it out for risers for the road bed. But the yard area is fine for sheet Homasote. He'll start laying track on Homabed roadbed product.
With the mainline agreed upon, he can also start running the bus lines for the DCC system. A quick check of my notes says that my last layout I used 12 or 14 AWG gauge single strand copper wire in both red and black colors for the bus lines. Feeder wires (or drops) are 18 to 22 AWG gauge single strand copper wire in both red and black colors. These are the wires that go from the bus to the track, and EVERY segment of track needs a drop. My rule. Got a question about DCC? Go here!!! DCC Wiki.
Thayne told me what DCC system he purchased, but I forgot. Maybe I can get him to email me the name so that those of you that are following along will know. There are a lot of you! I appreciate all your comments...keep them coming! Let me know if we leave something out or you need a copy of a drawing in 3PI format.
Thayne's electrician was over and discussed the lighting. Hopefully we'll have it in before too long as laying track in the dark is tough.
I'm glad he like it and is so excited about the layout! I'm going over to his house again Friday to help lay track and have a cold beverage. My bet is that all the track is laid and trains are running before I get there!
We went over the main line and traced it around the room. He likes it and doesn't want to make any changes. That is odd in that I've NEVER designed a perfect layout. Even after doing tons of them, there are always changes. No matter, we are good to go on the mainline.
We started talking construction and agreed that track laying needs to start with the hidden trackage along the back wall. While there we checked the measurement for the lower level fouling point. It was 4", which is what I had put into the drawing so we were lucky.


Thayne will also need to buy the turnouts, so let's help him out here...

Walther's Code 83, DCC Friendly - all of them
- #8 Curved Turnout LH - 2 each
- #8 Curved Turnout RH - 1 each
- #7 1/2 Curved Turnout RH - 1 each
- #7 Curved Turnout LH - 1 each
- #8 Straight Turnout LH - 2 each
- #8 Straight Turnout RH - 3 each
These little buggers aren't cheap, so THAYNE -please use the drawing to double check the list before you send it to Randy at The Train Shoppe here in Salt Lake City.
Randy and I talked about using Peco turnouts, but I have used both and dollar for dollar, I'd recommend the Walther's turnouts. Especially when using curved turnouts. Big trip to the bank for this, but the rest of the track is easy.
Thayne has already put down a layer of 1/2 inch plywood and a layer of Homasote over the entire layout. I probably wouldn't recommend doing that as it will create the need to saw some of it out for risers for the road bed. But the yard area is fine for sheet Homasote. He'll start laying track on Homabed roadbed product.
With the mainline agreed upon, he can also start running the bus lines for the DCC system. A quick check of my notes says that my last layout I used 12 or 14 AWG gauge single strand copper wire in both red and black colors for the bus lines. Feeder wires (or drops) are 18 to 22 AWG gauge single strand copper wire in both red and black colors. These are the wires that go from the bus to the track, and EVERY segment of track needs a drop. My rule. Got a question about DCC? Go here!!! DCC Wiki.
Thayne told me what DCC system he purchased, but I forgot. Maybe I can get him to email me the name so that those of you that are following along will know. There are a lot of you! I appreciate all your comments...keep them coming! Let me know if we leave something out or you need a copy of a drawing in 3PI format.
Thayne's electrician was over and discussed the lighting. Hopefully we'll have it in before too long as laying track in the dark is tough.
I'm glad he like it and is so excited about the layout! I'm going over to his house again Friday to help lay track and have a cold beverage. My bet is that all the track is laid and trains are running before I get there!
Tuesday, December 27, 2011
Willamette River Railway - Elevations and Turnouts Final
Here is a larger file that makes for better reading...


Willamette River Railway - Elevations and Turnouts
In order for Thayne to start construction of the right-of-way, he'll need elevations. Let's go through the layout and mark the key elevations for the main line. Well, all of it.
 Here is our plan so far...
 Here is the detail of the bridge area on the river. I'll add some stick bridges here and remove the marks.
 Sometime between when I drew this and the baby came downstairs to yell "choo choo" I forgot what this picture was about.
 To do elevations, I first start a LAYER called ELEVATIONS and turn it rusty red. I make small circles and put the elevations in inches inside. I'll keep these and change them as I go.
 Working around the layout I put in all key elevations, such as clearance points, lift out bridges, mainline key points, yard beginnings and ends, and sidings. Anything that might be needed for construction.
 Ok, here are the stick bridges that I put in. Ugly, but you get the point.
 Next, I created a LAYER called TURNOUTS and made it blue. By going around the layout and selecting the mainline turnouts I can get the code number for each turnout and put it beside the turnout. Lots of curved turnouts. Thayne may have to learn how to hand-lay track!


Subscribe to:
Posts (Atom)