I'm stuck in Chicago. Its snowing hard and cold. My family is in Utah and I miss them terribly. I'll be here all weekend in a hotel with nothing to do but work and tonight is Friday night. Arrgh. Hey! I know! Let's have a clinic!
This morning I remembered the old days before 9/11 when I used to carry models with me and work on them while I was on the road. It kept me out of trouble, out of bars and away from wild women. At least, most of the time. I so long for those days when you could carry a hobby knife in your overnight bag.
So tonight, we're going to have a clinic! Right here in my Hampton Inn hotel room #515 at the nice rolling desk, under the picture of a CQ-581 Troop Carrier plane photograph that my dad would have thought was really cool. I made a stop by Des Plaines Hobbies, Chicago's best supplied and grumpiest store. They have everything and its one of my favorite stores. The help leaves something to be desired. I'll never understand why hobby shops hire people that don't know how to sell.
I bought both supplies (materials that go into the model) and tools (things used to make models, which includes paint and glue) and brought them to my room, along with take-out from Steak'n Shake. The fries were cold. I'm probably going to be in Chicago every other week for a month or so, so I thought I would invest in some tools that I will leave in a plastic storage box with my name on them at the factory. That way I don't have to transport them.
Here is the handy rolling desk that is about 2 x 4 feet. I have my laptop and dinner. We're all set!
I bought a plastic shoe box and lid for storage. There is an X-acto hobby knife (cheapest they had) and some blades. They didn't carry single edged razor blades, my weapon of choice for finger surgery. There is also some super glue, white glue, a sanding board, a scale rule and some water colors for kids. What? Never mind now, I'll show you later.
So what are we going to make? Here are the supplies, so see if you can guess.
For those that don't scratchbuild, your first thought is probably "he bought a bunch of sticks" and you'd be right. However, if you look closely you'll see several pile trestle bridges laying on the bed in kit form! The plastic? That is for the cutting and framing template.
So from left to right we have in HO scale:
9" x 6" crosstie stock (they didn't have bridge ties or any handlaying supplies)
6" x 6" sway brace timber
12" diameter piling stock
12" x 6" stringer timbers
See! That Mascot Model Railroaders Scale came in VERY handy. I keep several in the drawer at the shop.
The wood is basswood, except for the piling stock which is come kind of hardwood. The wood is close to the protoype size, but not perfect. It really doesn't matter. Little trestles like these don't get a whole lot of attention and you need quite a few to make the railroad look real.
Fact of the matter is that most model railroaders will put in a water object (lake, stream, river) or two, but pay very little attention to the drainage situations on the line. I was awakened to this fact one day when I got a real blueprint from the Georgia Northeastern that had every single bridge and culvert listed in its 90 miles. The number of the was oustanding! Every tenth of a mile had some kind of drainage passage, trestle, culvert, bridge or something to allow water to pass. So I make it a practice to include them.
The layout needs lots of these wooden pile or deck pile trestles. Sitting in a hotel room is a good place and time to make them. They are easy, mass produced and look great on the layout, even without finite detail. tonight we'll build one from inexpensive components.
First, study the prototype. Using the handy laptop and Google Images, let's find a few pictues.
And then you need some PLANS!
Trestle Basics:
http://ghostdepot.com/bridges/wood_tres/lp_bent.gif
http://www.tsb.gc.ca/eng/rapports-reports/rail/2003/r03v0083/images/r03v0083_figure_6.gif
Trestle Building Jigs:
Now, the trick of this kind of modeling is to not overthink it. Let's just start building.
Using Evergreen Scale Model's #9040 Plain Styrene white .040" thickness, I cut a sheet about 5" by 5" to use as the base for a template. Next we'll take some Evergreen strip styrene #155 .060 x .100 inches and use it to block the boards for the jig. The jig is both a cutting guide and a positioning device.
Using the hobby knife I make a deep score in the styrene using the steel rule as a guide and being careful not to cut the hotel's desk.
I always write the description and scale of the jig on the board. I keep these for years and use them over and over.
Then we'll take the styrene strip stock and make a jig!
First I cut a 13' (in HO) length of styrene and glued it down with Superglue. Guess I'm new to Superglue as I got it all over everything! Including my fingers. What a mess. The board is now crooked permanently.
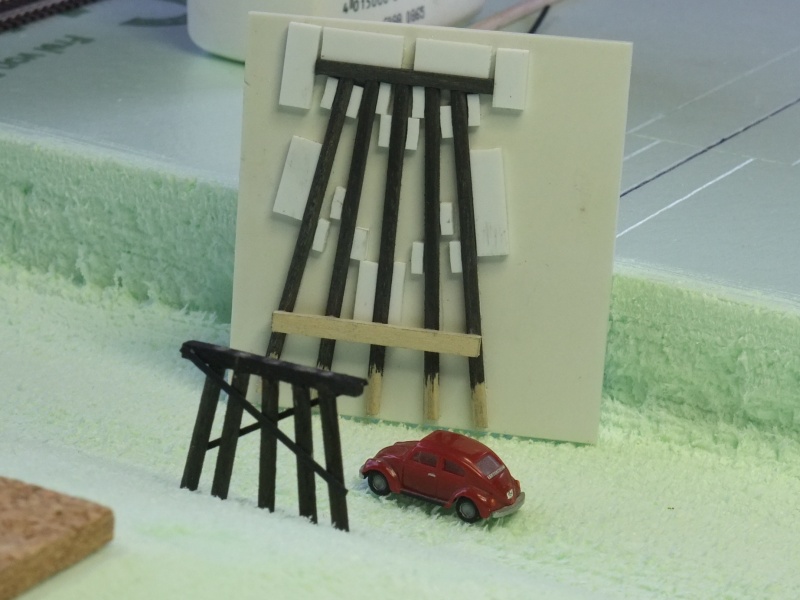
First we want to "lock" the top cap into place. There is a stop block on the right, and two small strips under the top cap.
Next I cut four 15' poles. Cutting hard wood poles is tough without a Zona saw (how I would normally cut them) but you can work at it and get them done.
Next I sanded them on the ends to make them smooth, so that I'd get a good glue joint.
Using the steel rule as a 90 degree angle I glued the first pole in place.
Then I glued the next center pole using the same method.
Using the sanding board I sanded a 20 degree angle for the two side poles and glued them in place.
I want to make different sizes of bents (trestle assembly) so I put in strips to mark the five foot and 10 foot marks.
Let's glue some cross bracing on the model. Not bad.
There! One trestle bent. I doesn't look right...but let's keep going. I'm having fun.
Here is the jig with the first test bent removed.
Let's cut a top cap, four poles and two sway braces (back and front).
I wanted paint or stain for the wood, but didn't want to leave it in the tool box where it would leak or dry up. While walking through Target I spotted some water colors and thought about getting some for my daughter. Then I thought...this is DRY paint. It doesn't ever leak. So I bought a set making sure it had brown and black color pads. Oh! And a brush! Total cost = $0.97.
It even comes with a handy paint tray and a place to keep your brush from rolling off the table.
Using water from a cup, I wet the water colors and mixed a little brown and a little black and began staining the wood. I set the pieces aside on a tissue to let them dry.
I glued all the pieces together in the jig and set them aside to dry. Dang, I'm thirsty!
Rule #1. When watercoloring, be sure to drink from the cup with the CLEAN water in it. That would be the one on the right. Since I use my LEFT hand to model and drink, I know have a disease called browntongue. It's similar to what politicians get and both leave a bad taste in your mouth.
There! One bent! So I figured out why it didn't look right to me, other than the top cap being too thin. I flipped the scale rule to the O scale side accidentally and incorrectly measured some of the boards. That top cap is 22' long! Should be 14' in Ho scale. @$!@#$!@!@ Got to do it over again.
But hey....we all make mistakes. Sometimes its hard to build models when you are tired, but you CAN do it in a hotel with a minimum amount of tools.


