I forgot to bring my camera. Somehow I've got to get a spare and leave it in the car. We worked on Coalfinger Ken's layout tonight. Concrete Keith and I showed up to eat his cookies and play with N scale track. Keith did most of the work while Ken and I talked about the L&N.
Its a nice layout, currently in two pieces for ease of assembly. We laid the yard siding and the lead to the yard.
What fun!

Monday, December 28, 2009
Thursday, December 24, 2009
My New Track Supplier
While I don't advertise on any of my blogs I will plug an extremely good supplier in order that others my benefit from their service.
My local hobby shop has been out of Micro Engineering track for months. I've asked them to order it repeatedly and they always say "its been out of stock and we get it when we get it." So I thought it was unavailable.
Finally, in an act of desperation I jumped on the HO egroup and asked for ideas as to where to get track. A nice fellow by the name of Glen Thomas said that his company Cream City Turnouts carried Micro Engineering and that he'd be glad to fill the order for me.
I told Glen that I really needed it before Christmas because I plan to work on the layout over the holidays. "No problem" he says. Glen gave me a price even better than my local hobby shop and had it Fed Ex'd to me (at no extra charge). It arrived yesterday in good order, drop shipped directly from Micro Engineering themselves! Two packs of six sticks, ME code 83 weathered HO track. Hey....I thought they were out of stock?
So thanks Glen and Cream City Turnouts.
It appears they produce a variety of custom turnouts....so give them a shot for your track needs!
Tuesday, December 22, 2009
Consultation with the Good Doctor
The doctor is in! Five cents please...
From my good friend Dr. Revis Butler, DDS...

Just to introduce Revis, I'm rather ashamed that he is asking me for help when he just got through winning a first place ribbon for passenger cars in the SER Region Convention!
http://www.ser-nmra.org/pdf/souv49n2.5.pdf check out page 42
The Live Oak, Perry and Gulf is a favorite railroad of mine. Logging trains in the South are my passion.
Some Live Oak, Perry & Gulf Photos
My suggestion for Revis...
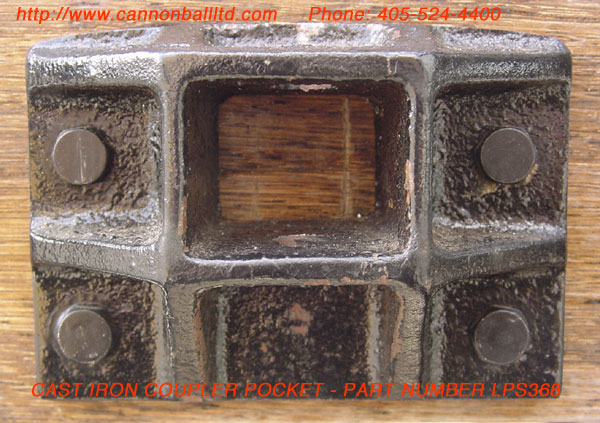
This device is called a coupler pocket. It was cast metal and designed for hard shocks from banging the cars together. The "fins" are all cast into the one piece. This was before welding was common.

I'd approach this piece as a plastic project. Using very thin styrene sheet, probably .005 and .010 sheet styrene from Evergreen Scale Models, I would construct the whole piece. The styrene is available at most hobby shops. I'd make the base square (see diagram) out of .010 and cut a square hole for the coupler shank.

Using strips of .010 I'd make the front box square out of four pieces. I'm not sure of the dimensions here, but you might be able to estimate the dimensions from the coupler itself. Then using .005 styrene, make the "fins" or angled supports. Once it is all glued together and dry, test fit it on one of the cars.
To make a functional model, it may need to be a bit wider than the prototype in order to work well. After the first one is assembled you can make a silicone mold and cast the parts in resin which will make it much stronger.
Grandt Line makes some of these types of coupler pockets which you can use for inspiration!
Cannonball's cast iron pocket
Cast iron pocket drawing
Hope that helps! Can't wait to see the model. I'm still blown away by your turpentine mill!
Scott Perry
From my good friend Dr. Revis Butler, DDS...
Dear Scott,
I need some advice. I'm building a scratch-built flat car based
on the LOP&G prototype shown attached. On each end where the coupler arm extends from the end of the car is a rather elaborate attachment which I need to copy. Would I be best to try to take a piece of wood or plastic and carve it out or what. I'd like to try to make the model as much like the prototype as possible. If you have a chance, please share your thoughts about this. I've got an instrument for making the rivet dimples so I'm doing that with sheet styrene then gluing it to the underlying structure. That seems to have worked so far. Tedious.
Hope you and your family have a Blessed Christmas.
Dr. Revis Butler, Jr.

Click On Photo To Enlarge
Just to introduce Revis, I'm rather ashamed that he is asking me for help when he just got through winning a first place ribbon for passenger cars in the SER Region Convention!
http://www.ser-nmra.org/pdf/souv49n2.5.pdf check out page 42
The Live Oak, Perry and Gulf is a favorite railroad of mine. Logging trains in the South are my passion.
Some Live Oak, Perry & Gulf Photos
My suggestion for Revis...
This device is called a coupler pocket. It was cast metal and designed for hard shocks from banging the cars together. The "fins" are all cast into the one piece. This was before welding was common.

I'd approach this piece as a plastic project. Using very thin styrene sheet, probably .005 and .010 sheet styrene from Evergreen Scale Models, I would construct the whole piece. The styrene is available at most hobby shops. I'd make the base square (see diagram) out of .010 and cut a square hole for the coupler shank.

Using strips of .010 I'd make the front box square out of four pieces. I'm not sure of the dimensions here, but you might be able to estimate the dimensions from the coupler itself. Then using .005 styrene, make the "fins" or angled supports. Once it is all glued together and dry, test fit it on one of the cars.
To make a functional model, it may need to be a bit wider than the prototype in order to work well. After the first one is assembled you can make a silicone mold and cast the parts in resin which will make it much stronger.
Grandt Line makes some of these types of coupler pockets which you can use for inspiration!
Cannonball's cast iron pocket
Cast iron pocket drawing
Hope that helps! Can't wait to see the model. I'm still blown away by your turpentine mill!
Scott Perry
Sunday, December 20, 2009
Updates
Recently I went on a railfanning trip to the GNRR and the CSX. You can see the GNRR photos here as I post them...
http://georgianortheasternrr.blogspot.com/
I've also been doing a lot of work on the Dixie Central
http://dixiecentralrailroad.blogspot.com/
More design work is being done on the B&O layout as well.
http://stevesbando.blogspot.com/
http://georgianortheasternrr.blogspot.com/
I've also been doing a lot of work on the Dixie Central
http://dixiecentralrailroad.blogspot.com/
More design work is being done on the B&O layout as well.
http://stevesbando.blogspot.com/
Thursday, December 3, 2009
Helping Out
I know not to stop by the train store on the way home. Especially now that it is on the way home!
Got sidetracked last night. Ran into Bob and Mark, and a new friend Bill. Bill is new to model railroading and had just bought some equipment. He needed some help with a layout design, so naturally I jumped in.
All in all I lost track of time and was late coming home. The foreman was quiet calm about it.
It amazes me how I can completely lose track of time when I'm around the trains.
Sunday, November 29, 2009
HOn3 becoming the new On30?
It appears that HOn3 is on the rise with more affordable and available rolling stock and track. Still, locos are hard to find.
If there were available and affordable locos, would HOn3 explode like On30 did due to its compact size?
I think it would...
Once I get a few layouts off my plate, I'm going to work on an HOn3 layout design.
If there were available and affordable locos, would HOn3 explode like On30 did due to its compact size?
I think it would...
Once I get a few layouts off my plate, I'm going to work on an HOn3 layout design.
Saturday, November 28, 2009
Layout Tours
The Piedmont Division of the NMRA's layout tour program called The Piedmont Pilgrimage is still one of my all time favorite events.
This weekend I was able to see Charles Aycock's Piedmont & Southern layout. This layout is complete and all the scenery is wonderfully done. I just had to stop and chat with Charlie about his dirt roads. They were wonderfully done and looked very realistic.
Ran into my friend I. D. Jackson who is ready to design his Georgia Northeastern Railroad, so I was able to pick up his deminsions. We'll send him the questionaire and then get started about Christmas time.
I also ran into Dan Berman and went to see his Georgia Southern layout. This was a track plan that I designed about two years ago just for Dan. While it doesn't fit an exact prototype it appears to be a lot of run to run. Dan has all the trackage in as well as the wiring.
By special appointment I was able to visit Perry Lamb's Utah, Colorado & Western. This is a fantastic modern layout and appears to be lots of fun to operate. His train room is finished to the "T" so it is always a nice place to visit.
Wednesday, November 25, 2009
What's New In the Basement
I designed a new layout and it is now under construction!
Follow along here...
Follow along here...
Sunday, September 20, 2009
Product Review: DVD Painting Figures with Dave Revelia

Painting Figures with Dave Revelia
DVD by Scott Mason at www.scottymason.com
Overview: How to highly detail paint model railroad for a more realistic appearance. Dave uses techniques familiar to war gamers and other miniaturists.
This DVD is awesome and is the favorite of the three I recently purchased from Scotty Mason. Dave Revelia is an excellent modeler and his talent really shows.
This video is an important one. For any modeler railroader who has gone to a model exhibition other than a railroad one, you know why. Our scale people look terrible! Try the figures on a military diorama or a war gamers’ table. We don’t even come close to the quality. Why? We don’t spend the time or money to properly populate the layout. People really make the layout and in fact, people are what the layout is about. Without them there are no reasons for having trains. I’ve laughed at the many depot scenes I’ve witnessed that don’t even have one person standing around. People are important!
But even more important is that a poorly painted figure with flash and bright colors will absolutely kill your 200 hour and $500 dollar structure! Yet people take cheap figures and just glue them willy-nilly on the model all the time. This DVD will let you get the people right for the model and make it add to the scene, not subtract from it.
The fantastic part is that he goes into detail about the pre-painting steps! Dave teaches you about brushes and brush care which most books don’t really address. He covers paints and paint mixing and even pallets. All is very well done and the amateur could take this video and run with it.
One suggestion that I’d like to give the Mason team is that it would be nice at the end of the DVD if you would list all the suppliers and their contact information. I’ve never heard of Valejo or Andrea paints and figure they are from some miniature specialist company. So I’m going to have to search for them.
Another issue that Dave didn’t really cover is how to properly hold the figure for painting. He was doing this at a table with sharp corners. Normally I pad the area as I’ve had my little fingers go numb from pressing my forarms into the table top. Everyone will develop their own way, but it is important that you are comfortable in order to control the brush.
It was hard to see him actually painting the figures. The camera guy did as good as he could I think but it might have helped if there were some diagrams like the eye diagram to show where to put the paint. O scale is very small, so maybe some G scale figures would have been better.
I can’t believe Dave didn’t show us how to paint the fabulous checkered shirt on one the figures working on his boat builder’s diorama. That was a great figure and the shirt was a prize winner! How about DVD part #2?
As to the video itself, it was very professionally made and the sound/video parts were well done. I hate the wrinkled black backdrop in the background. Another feature I don’t enjoy is the intentional blurring as the camera focuses in on a miniature. It is hard on the eyes and I find myself looking away.
Dave, if you do a volume two we’d like to see more examples of painting, maybe women and animals. The use of brighter colors would be nice and we’d especially like to see you paint figures in N and HO scale.
All in all this is a fine video and worth $30.
Scott Perry
http://modelrailroadersnotebook.blogspot.com/
Saturday, September 19, 2009
Let There Be Light - Now at Scott's House
We had a hard time getting started tonight. I had a hard time getting started. Suffering from jet lag from a week long trip to California and working 16 hours a day or more kills you. Really, I'm starting to hate doing this on Friday nights. It's the worst night of the week.
Thanks Rick for the photos...it really makes the blog!!!
 Tonight's fun club is Glue Bob, Steve-bay, Coalfinger Ken, Popsicle Rick and Gator. We started off the evening with Ken assembling the rolling draw units I bought a month ago for scenery materials. Then he and Steve sanded and painted the benchwork with $2 reject paint from Home Depot. It is now a yucky gold color, but that will all be covered up. Its just to seal the wood.
 Steve is taking the belt sander and leveling the spackle for a nice, smooth surface.

Bob, Rick and myself attacked the lights. I'm installing five sets of 4-bulb florescent in the room. This should light up everything.
 Bob did the wiring, but we had to redo some of what Scott had done previously as the pigtails were not long enough.
 Not sure who told Steve he could crawl all over the benchwork, but he was doing so well that we left him alone.
 It is hard to take pictures of guys installing lights when there is no light. Where's the flash, Rick?
 Ken had the roller and was making quick work of the painting. Inspection of "Coalfinger's" fingers showed no paint at all!
 Rollin' rollin' rollin'...
 The plugs didn't fit through the conduit so Scott had to take them apart and re-install them.
 Bob is good for high level electrical work!
 Please don't hit the watermain!
 One by one the lights are installed...
 Paint continues to flow...all the time the group chatter is brutal and divisive. Even Rick lost his speaking privileges!
 We'll like it better when the big lights are in!
 Bob rewires the pigtails...

The island is in the way! Time for it to float out to the main room.
 Ken gives it a coat of paint while its out there.

It rolled back into place later...just perfectly!

This has become a very handy system for getting some layout out of the way.
 Scott fell off the ladder. This time lapse photo shows him about to collide with the concrete. Rick mopped up the floor. Thanks Rick!

Painting was completed over half the layout, which is great! We will need more $2 paint.

Scott tried his hand at wiring. Good thing it wasn't hot like Kevin's wires last week.
The photos ran out here as Rick had to leave, but we were able to get all five banks of lights installed, discussed the backdrop, painted the benchwork and everything else in one evening. Thanks guys! I'll wire up the lights next week.
Thanks Rick for the photos...it really makes the blog!!!
 Tonight's fun club is Glue Bob, Steve-bay, Coalfinger Ken, Popsicle Rick and Gator. We started off the evening with Ken assembling the rolling draw units I bought a month ago for scenery materials. Then he and Steve sanded and painted the benchwork with $2 reject paint from Home Depot. It is now a yucky gold color, but that will all be covered up. Its just to seal the wood.
 Steve is taking the belt sander and leveling the spackle for a nice, smooth surface.
Bob, Rick and myself attacked the lights. I'm installing five sets of 4-bulb florescent in the room. This should light up everything.
 Bob did the wiring, but we had to redo some of what Scott had done previously as the pigtails were not long enough.
 Not sure who told Steve he could crawl all over the benchwork, but he was doing so well that we left him alone.
 It is hard to take pictures of guys installing lights when there is no light. Where's the flash, Rick?
 Ken had the roller and was making quick work of the painting. Inspection of "Coalfinger's" fingers showed no paint at all!
 Rollin' rollin' rollin'...
 The plugs didn't fit through the conduit so Scott had to take them apart and re-install them.
 Bob is good for high level electrical work!
 Please don't hit the watermain!
 One by one the lights are installed...
 Paint continues to flow...all the time the group chatter is brutal and divisive. Even Rick lost his speaking privileges!
 We'll like it better when the big lights are in!
 Bob rewires the pigtails...
The island is in the way! Time for it to float out to the main room.
 Ken gives it a coat of paint while its out there.
It rolled back into place later...just perfectly!

This has become a very handy system for getting some layout out of the way.
 Scott fell off the ladder. This time lapse photo shows him about to collide with the concrete. Rick mopped up the floor. Thanks Rick!
Painting was completed over half the layout, which is great! We will need more $2 paint.

Scott tried his hand at wiring. Good thing it wasn't hot like Kevin's wires last week.
The photos ran out here as Rick had to leave, but we were able to get all five banks of lights installed, discussed the backdrop, painted the benchwork and everything else in one evening. Thanks guys! I'll wire up the lights next week.
Rainy Days...
Are good for going shopping! Marie needed some new sanding sponges, which means Harbor Freight! I went looking for this...
http://www.harborfreight.com/cpi/ctaf/displayitem.taf?Itemnumber=66182
But they didn't have it. So I ordered it on line. We'll let you know how it works. You never know with Harbor Freight...sometimes great, sometimes not.
Here is a neat program that Glue Bob sent to me. Its a bridge building software "game" that let's you design a bridge. Could be handy for figuring out if you have the right type of bridge.
http://faculty.philau.edu/oakleyd/Structures_2/West_Point_Bridge_Designer/west_point_bridge_designer.htm
My buddy Steve is ready to go for the season. He owns the company Model Train Seller at http://modeltrainseller.com/ and sells used collections of trains. He's picky about what he sells, and often has some really great stuff. He's picking up a new collection today so watch for him on ebay at modeltrainseller.
Tuesday, September 15, 2009
Product Review: Painting and Weathering Detail Castings With Dave Revelia
 Painting and Weathering Detail Castings With Dave Revelia
DVD by Scott Mason at www.scotttymason.com
Overview: “How to” DVD that covers basic detail component painting and weathering. Most details are primarily O scale, but tips span all scales.
I have to admit I really enjoyed this video. Dave really knows how to apply color and texture, and most of the techniques applied directly to what I’m working on now. His use of paints along with texture powders really does make a model “pop” out into the scene. Dave really goes into the finest detail about painting so anyone that sees this program should be able to follow the simple instructions and get award winning work.
My first thought is that I’d like to have seen more work around preparing the detail part and giving it a base coat. These steps are critical to good work and need to be understood. Likewise, some of his techniques are a bit dated, though they still work very well. Instead of hand painting barrel staves, I use a paint marker to do it which is faster, gives you more control and dries quickly. Many award winning modelers seldom change or develop new techniques, I’ve found.
As to the DVD, the photography work is excellent as is the sound. It is clear and crisp. Photographing such small items is really hard so you will enjoy the close up work. The ugly black wrinkled curtain is back again, and to make it worse Dave has on a black shirt. There is no humor but some light background music makes watching more pleasant.
It would be a stretch to say the DVD is worth $30. I’d say more like $15. It is worth watching and will give you some great ideas, so buy one and sell it to a friend for half off when you watch it a few times.
Product Review: Building Craftsman Structure Kits Volume 2 DVD
 Building Craftsman Structure Kits Volume 2
DVD by Scott Mason at www.scotttymason.com
Overview: “How to” DVD that covers basic structure kit assembly techniques. This is a continuation from Volume 1.
Let’s face it. Most model railroad how-to videos are boring. The techniques are important to us, but watching them on TV is like watching paint dry. Volume 2 of Building Crasftsman Structure Kits is no different.
I do like how this video is structured. You can pick a topic and just watch one topic at a time. That makes it a little more palatable. I watch two or three at a time and then turn it off. My guess is that because the techniques are often time consuming and most hosts are a bit on the monotone side because they are trying to concentrate is what leads to the dullness.
This is Scotty Mason’s second video on this topic. I’ve not seen the first because at $30 a pop they aren’t cheap. Are they worth $30? Not to me. $15 seems to be a more reasonable price when you look at what material you are learning. A good Kalmbach book runs around $20, so I’d say that is my high end spend. In this video all you are really learning is what George Sellios is writing in his excellent kit instructions. So my thought is that it is smarter to invest in the kit than a DVD on kit assembly. Member of the NMRA can get copies of kit instructions for a minimal charge at the Kalmbach Library in Chattanooga.
As to the DVD itself, it is fairly well produced. The camera clarity is excellent, as is the sound. I like the music playing while Scott does the detail work, and the large work space makes it easy to see the tools and supplies. Behind the instructor is a wrinkled black backdrop that makes Scotty’s shiny forehead stand out even more. Is it just me or does Scott remind you of George Costanza. Soon he’ll say “it’s not a pick” and I’ll bust out laughing. Close up shots are very well done and in general the photographic work is excellent. My only pet peeve is the blurry shot that leads in to the next technique and has a thin type style saying the topic name. It is very hard on the eyes.
There is no doubt that Scotty is a top model builder. His work is fantastic. I really enjoy watching him work. Most of the techniques are nothing very new and inventive, but for folks that don’t like to ready instructions, this is the perfect substitute. He keeps referring back to Volume 1, so my thought is that if you are interested in this type of program, buy Volume 1 first as most of the good stuff is probably there.
The one technique he used that I loved and had not seen before was the stucco technique. It looked fantastic and was just what I needed for my adobe structures. Other than that, you’d be better off just to by a Fine Scale Miniatures kit and kit it a go. You’ll learn more and its hands on.
Saturday, September 12, 2009
Wheeler's Back In Town
The men of the NCIOG gathered again on Friday like we do every week. This time we were glad to see our friend Glue Bob return from Canada! So we raided his house.
In attendance: Glue Bob, Popsicle Rick, Coalfinger Ken, Packrat Paul, Steve-bay, Concrete Keith and Gator. The first order of business was to check out Bob's homework. His job was to take non-train pictures of his home town in Canada so that we can use them for scenery. He did a great job but I did see a locomotive or two represented.
 Gator carefully studies the photos and asks Bob if he wants to model the graffitti on the rocks or not.
 Concrete Keith is in from Chicago! Always good to see him. A top notch modeler even if he is scenery-phobic.
 The night continued as we shed some light on the subject. The back corner of the layout has been dark and the scenery team (Scott & Rick) have been complaining about not being able to see the colors in the dark. So Bob got some lighting for us.
 Keith is a whiz with electricity. He's so good he took off the light without turning of the 120 volts circulating through the copper. Smooth! I stayed in the background with my cell phone ready to call 911.
 Bob made a hole and shoved the wire up into the attic.
 Scott begs Keith to turn off the power....nothing doing!
 Terrified of the ensuing accident, Scott goes over to help Steve who is laying track in the yard. Scott helps by coating the bottoms of the rails with Pliobond and letting them dry.
 Steve is quite handy when it comes to track! He's working on straight sections here and then will build in the turnouts.
 Ken gets some supplies and helps Steve by staining all the ties from the yard to Swas Junction. They look great when he's done and his fingers are clean!

Paul says Ken missed a spot. This is the last known picture of Paul in existence. The widow Donna says send donations.
 Here is Bob's rail jig designed to hold the rails while the Pliobond dries.
 Steve works really fast under the bright light with the very hot soldering iron.
 Logistics become a problem with seven men in the room and the air conditioning has to run full blast.
 Steve heats up a rail to move it into position.
 Bob and Keith make quick work of the wiring. Bob shoves it in and Keith is pulling on the other end.
 "Hey, what's this? A whistle" ....NO, it's the wire with electricity on it!!!!
 Bob moves in to relieve Paul from holding the wire as his arm is turning pail and his face is turing red.
 Keith is working the yard on the upper deck. Nice, white shoes!
 Scott is drowning in scenery...the guys will paint the backdrop later tonight!
 Why is it not working? Oops...ALL the wires have to be connected.
 I have a $10 spot saying he falls off the ladder...
 What! No paint! Crap! Rick and Scott get in the car and go to Wally Mart. Apple Barrel paints are great for scenery! We buy $7.00 worth.
 While Rick and Scott are gone, the rest of the guys paint the backdrop.
 One color...that's easy!
 Oops....add some white.
 We're back with the paints. Rick blends the colors while Scott paints the rock facings. Messiness counts.
 A blotch here, a blotch there and then some ink wash to blend them together. Perfect!
 Just a light mist...two or three drops of india ink in alcohol.
 A picture of Rick doing nothing. Thanks Rick for all these great photos! I'll remember my camera one day!
 Bob's list of projects is really getting done tonight!
 Check...check...check....we're done!
 Here is Rick and Scott's rock work. Not quite right. Bob's photos show more yellow, so we'll let the dry and play with it some more next trip.
 Removable scenery is a nifty idea. We may do more with this in the future.
 Ken staining the last of the ties.
 The trick is not to get it on the floor. Or your shirt. Or your hands. Ken has it down pat.
 A rock cut with a little iron ore.
 Another area of the rock outcropping. Bob is excited. Me too!
There goes another great night on the railroad!
In attendance: Glue Bob, Popsicle Rick, Coalfinger Ken, Packrat Paul, Steve-bay, Concrete Keith and Gator.
 The first order of business was to check out Bob's homework. His job was to take non-train pictures of his home town in Canada so that we can use them for scenery. He did a great job but I did see a locomotive or two represented.
 Gator carefully studies the photos and asks Bob if he wants to model the graffitti on the rocks or not.
 Concrete Keith is in from Chicago! Always good to see him. A top notch modeler even if he is scenery-phobic.
 The night continued as we shed some light on the subject. The back corner of the layout has been dark and the scenery team (Scott & Rick) have been complaining about not being able to see the colors in the dark. So Bob got some lighting for us.
 Keith is a whiz with electricity. He's so good he took off the light without turning of the 120 volts circulating through the copper. Smooth! I stayed in the background with my cell phone ready to call 911.
 Bob made a hole and shoved the wire up into the attic.
 Scott begs Keith to turn off the power....nothing doing!
 Terrified of the ensuing accident, Scott goes over to help Steve who is laying track in the yard. Scott helps by coating the bottoms of the rails with Pliobond and letting them dry.
 Steve is quite handy when it comes to track! He's working on straight sections here and then will build in the turnouts.
 Ken gets some supplies and helps Steve by staining all the ties from the yard to Swas Junction. They look great when he's done and his fingers are clean!
Paul says Ken missed a spot. This is the last known picture of Paul in existence. The widow Donna says send donations.
 Here is Bob's rail jig designed to hold the rails while the Pliobond dries.
 Steve works really fast under the bright light with the very hot soldering iron.
 Logistics become a problem with seven men in the room and the air conditioning has to run full blast.
 Steve heats up a rail to move it into position.
 Bob and Keith make quick work of the wiring. Bob shoves it in and Keith is pulling on the other end.
 "Hey, what's this? A whistle" ....NO, it's the wire with electricity on it!!!!
 Bob moves in to relieve Paul from holding the wire as his arm is turning pail and his face is turing red.
 Keith is working the yard on the upper deck. Nice, white shoes!
 Scott is drowning in scenery...the guys will paint the backdrop later tonight!
 Why is it not working? Oops...ALL the wires have to be connected.
 I have a $10 spot saying he falls off the ladder...
 What! No paint! Crap! Rick and Scott get in the car and go to Wally Mart. Apple Barrel paints are great for scenery! We buy $7.00 worth.
 While Rick and Scott are gone, the rest of the guys paint the backdrop.
 One color...that's easy!
 Oops....add some white.
 We're back with the paints. Rick blends the colors while Scott paints the rock facings. Messiness counts.
 A blotch here, a blotch there and then some ink wash to blend them together. Perfect!
 Just a light mist...two or three drops of india ink in alcohol.
 A picture of Rick doing nothing. Thanks Rick for all these great photos! I'll remember my camera one day!
 Bob's list of projects is really getting done tonight!
 Check...check...check....we're done!
 Here is Rick and Scott's rock work. Not quite right. Bob's photos show more yellow, so we'll let the dry and play with it some more next trip.
 Removable scenery is a nifty idea. We may do more with this in the future.
 Ken staining the last of the ties.
 The trick is not to get it on the floor. Or your shirt. Or your hands. Ken has it down pat.
 A rock cut with a little iron ore.
 Another area of the rock outcropping. Bob is excited. Me too!
 There goes another great night on the railroad!
Subscribe to:
Posts (Atom)